外木山的風景...因為大武崙砲台在位置上的得天獨厚...一覽無遺!
(清朝時在此設立視野良好的砲台...射程可涵蓋基隆港的進出航線...)
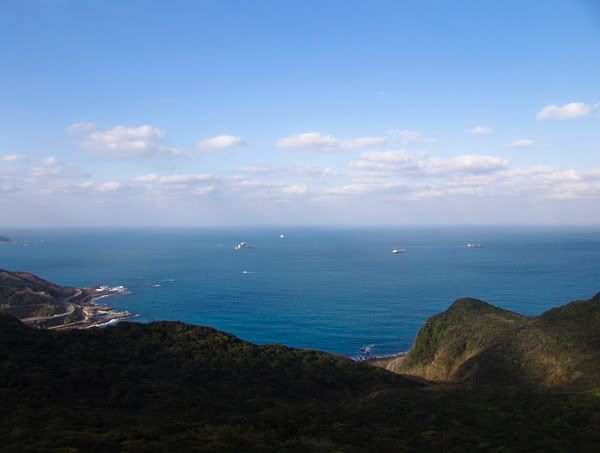
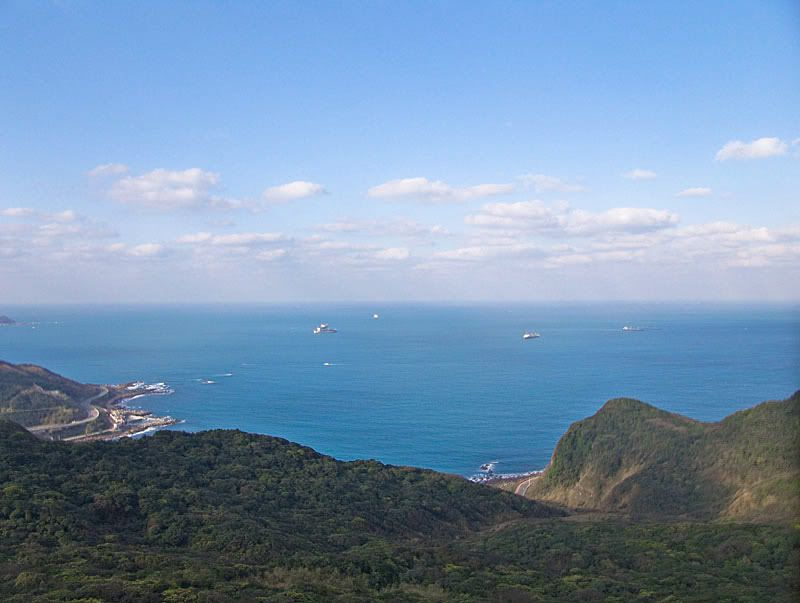
遠天...中海...近山...比例剛好!
第1張...對著海天交界處做平均測光所拍攝...
雲朵的層次和海面潾潾的波光的曝光都和眼睛現場所見相同...
(海天交界處的霧氣...是低溫的海水被陽光蒸發後...化作霧狀上升成雲)
但是近處的外木山就顯得曝光不足了!
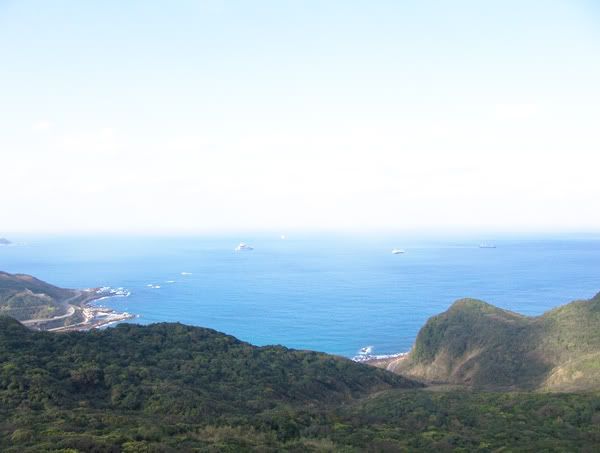
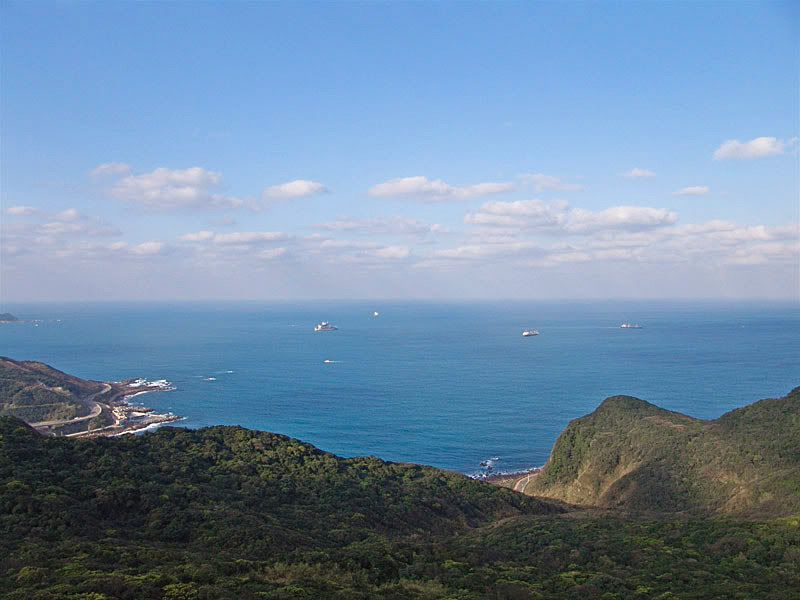
第2張...對著海-山交界處做平均測光...
因為這時太陽被雲層擋住了...山景的部分...光線較弱
...曝光起來的結果...雲朵就曝光過度了!
上面2張照片...不是曝光過度...就是曝光不足...這在數位相機上
和人眼演化了幾百萬年來適應太陽光線的構造...相比起來...
是無法改變的事實...請參考:
◎ 數位攝影與梵谷...[動態範圍]
這次為了彌補數位相機的先天缺陷..用了另一種數位方法:數位融合
此方法是參考下列連結:
http://www.luminous-landscape.com/tutorials/digital-blending.shtml
將步驟翻譯給大家...不過還是建議大家如果時間允許...可以看看英文網頁的說明!
(一) Put both images onscreen at the same time. Select the dark frame and press CTRL-A to select the whole thing. (Of course you'll always use Command instead of Control if you are using a Mac.) Press CTRL-C to copy it. Close that picture, as you no longer need it.
Select the light frame and press CTRL-V to paste the dark frame into it
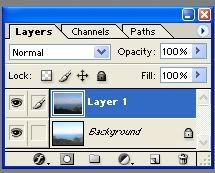
If you look at the Layers palette (Figure #1) you will now see your light image as Background Layer and your pasted dark image as Layer 1.
1.將明暗2張照片...同時放在photoshop螢幕視窗上...
2.選取"暗"的1張...同時按下CTRL鍵和A鍵...以選取整個照片!
3.同時按下CTRL鍵和C鍵...以複製這張照片
4.然後將"暗"的這張照片關閉...當作您不在需要它!
5.選取"亮"的1張照片...同時按下CTRL鍵和V鍵...
以將"暗"的照片...貼在"亮"的1張上面...
6.如果此時您觀看圖層色板...您會看見"亮"的1張當成背景底圖
...而"暗"的1張當成圖層1
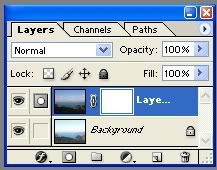
(二) add a Layer Mask. This is done by clicking on the second icon on the lower left of the Layers palette. You will now see a white rectangle next to the image on the Layer 1 layer. (See Figure #2).
1.增加一個"圖層遮罩"
2.做法是...按下位於圖層色板下方...左邊算來第二個的圖示
3.這時您會看見1個緊鄰著圖層1中的影像...的白色矩形...(如附圖)
(三) Click on the background layer on the palette and the press CTRL-A to select the whole image. Press CTRL-C, copying it to the clipboard. Now hold down the ALT key (Option on the Mac) and click on the white mask rectangle on the Layer 1 palette.
The whole image will now turn white. Next, press CTRL-V to paste the contents of the clipboard onto the white mask. You will now see a B&W mask image. With the B&W mask displayed go to Filter / Blur / Gaussian Blur and set the Radius to about 40 pixels. Click on the Background Layer and you're done.
1.按下圖層色板上背景底圖的圖層
2.同時按下CRTL鍵和A鍵...以選取整個背景底圖的圖片
3.接著按下CRTL鍵和C鍵...以便將其複製到"剪貼簿"上...
4.接著...按住ALT鍵不放...同時將滑鼠游標按下圖層1的白色矩形...
...這時桌面上的圖片視窗...會整個變成白色...
5.接著...按下CRTL鍵和V鍵...將"剪貼簿"上的圖片...貼在白色遮罩上
...這時...您會見到一張黑白遮罩的影像
6.將這黑白遮罩影像...進入Filter / Blur / Gaussian Blur的工作列選項中
...同時將Radius設為40 pixels
7.按下背景底圖的圖層...
8.大功告成!
附記:
1.動作熟練之後...大概20秒可以將2張"融合"成1張...
這是這輩子第1次用Photoshop做照片製作
...40歲的老人...也可以20秒做完!...大家做起來應該更輕鬆...
2.風景照中有含"主題"(人...船...建築)的照片...如果"主題"曝光正確
即使背景(天...海...山)的曝光不正確...也不需要太計較!
...但是這張*外木山海岸*的照片...主題就是風景全部...
所以會希望天-海-山...都曝光正確!
...才要如此用到[數位融合]
3....2張照片雖然曝光值不同...但是照片要照得一模一樣!
偶的經驗是要用到"三腳架"...
再利用不同曝光值來取得不同的明暗2張照片
4.實際經驗中...如果用F828的S.A.M模式更改不同曝光值時
...容易晃動到相機...導致照片的景物位置偏移...而失敗!
使用"包圍曝光BRK"的設定...可以減少失敗!
5.最好還是用"快門線"來驅動快門...在按機身快門鍵時
...還是容易晃動!
這張是用*人工*包圍曝光拍的...
下張是用RAW檔...調出2張不同EV值...再Blending...
(清朝時在此設立視野良好的砲台...射程可涵蓋基隆港的進出航線...)
遠天...中海...近山...比例剛好!
第1張...對著海天交界處做平均測光所拍攝...
雲朵的層次和海面潾潾的波光的曝光都和眼睛現場所見相同...
(海天交界處的霧氣...是低溫的海水被陽光蒸發後...化作霧狀上升成雲)
但是近處的外木山就顯得曝光不足了!

第2張...對著海-山交界處做平均測光...
因為這時太陽被雲層擋住了...山景的部分...光線較弱
...曝光起來的結果...雲朵就曝光過度了!

上面2張照片...不是曝光過度...就是曝光不足...這在數位相機上
和人眼演化了幾百萬年來適應太陽光線的構造...相比起來...
是無法改變的事實...請參考:
◎ 數位攝影與梵谷...[動態範圍]
這次為了彌補數位相機的先天缺陷..用了另一種數位方法:數位融合
此方法是參考下列連結:
http://www.luminous-landscape.com/tutorials/digital-blending.shtml
將步驟翻譯給大家...不過還是建議大家如果時間允許...可以看看英文網頁的說明!
(一) Put both images onscreen at the same time. Select the dark frame and press CTRL-A to select the whole thing. (Of course you'll always use Command instead of Control if you are using a Mac.) Press CTRL-C to copy it. Close that picture, as you no longer need it.
Select the light frame and press CTRL-V to paste the dark frame into it
If you look at the Layers palette (Figure #1) you will now see your light image as Background Layer and your pasted dark image as Layer 1.
1.將明暗2張照片...同時放在photoshop螢幕視窗上...
2.選取"暗"的1張...同時按下CTRL鍵和A鍵...以選取整個照片!
3.同時按下CTRL鍵和C鍵...以複製這張照片
4.然後將"暗"的這張照片關閉...當作您不在需要它!
5.選取"亮"的1張照片...同時按下CTRL鍵和V鍵...
以將"暗"的照片...貼在"亮"的1張上面...
6.如果此時您觀看圖層色板...您會看見"亮"的1張當成背景底圖
...而"暗"的1張當成圖層1

(二) add a Layer Mask. This is done by clicking on the second icon on the lower left of the Layers palette. You will now see a white rectangle next to the image on the Layer 1 layer. (See Figure #2).
1.增加一個"圖層遮罩"
2.做法是...按下位於圖層色板下方...左邊算來第二個的圖示
3.這時您會看見1個緊鄰著圖層1中的影像...的白色矩形...(如附圖)

(三) Click on the background layer on the palette and the press CTRL-A to select the whole image. Press CTRL-C, copying it to the clipboard. Now hold down the ALT key (Option on the Mac) and click on the white mask rectangle on the Layer 1 palette.
The whole image will now turn white. Next, press CTRL-V to paste the contents of the clipboard onto the white mask. You will now see a B&W mask image. With the B&W mask displayed go to Filter / Blur / Gaussian Blur and set the Radius to about 40 pixels. Click on the Background Layer and you're done.
1.按下圖層色板上背景底圖的圖層
2.同時按下CRTL鍵和A鍵...以選取整個背景底圖的圖片
3.接著按下CRTL鍵和C鍵...以便將其複製到"剪貼簿"上...
4.接著...按住ALT鍵不放...同時將滑鼠游標按下圖層1的白色矩形...
...這時桌面上的圖片視窗...會整個變成白色...
5.接著...按下CRTL鍵和V鍵...將"剪貼簿"上的圖片...貼在白色遮罩上
...這時...您會見到一張黑白遮罩的影像
6.將這黑白遮罩影像...進入Filter / Blur / Gaussian Blur的工作列選項中
...同時將Radius設為40 pixels
7.按下背景底圖的圖層...
8.大功告成!

附記:
1.動作熟練之後...大概20秒可以將2張"融合"成1張...
這是這輩子第1次用Photoshop做照片製作
...40歲的老人...也可以20秒做完!...大家做起來應該更輕鬆...
2.風景照中有含"主題"(人...船...建築)的照片...如果"主題"曝光正確
即使背景(天...海...山)的曝光不正確...也不需要太計較!
...但是這張*外木山海岸*的照片...主題就是風景全部...
所以會希望天-海-山...都曝光正確!
...才要如此用到[數位融合]
3....2張照片雖然曝光值不同...但是照片要照得一模一樣!
偶的經驗是要用到"三腳架"...
再利用不同曝光值來取得不同的明暗2張照片
4.實際經驗中...如果用F828的S.A.M模式更改不同曝光值時
...容易晃動到相機...導致照片的景物位置偏移...而失敗!
使用"包圍曝光BRK"的設定...可以減少失敗!
5.最好還是用"快門線"來驅動快門...在按機身快門鍵時
...還是容易晃動!
這張是用*人工*包圍曝光拍的...
下張是用RAW檔...調出2張不同EV值...再Blending...

留言